3D Printing
Subtractive manufacturing: a process in which a material is cut to a desired final shape and size by a controlled material-removed process.
Task : Design and 3D print an object that could not be made easily subtractively
After doing some research on possible objects, I decided on a whistle to 3D print. A whistle mainly produces sound when air is forced through an opening, with the help of a ball in a chamber to enhance the sound. As subtractive manufacturing works by removing material, it would be difficult to manufacture the ball inside the chamber.
I used a video to help guide me on the whistle making process
Design process of whistle
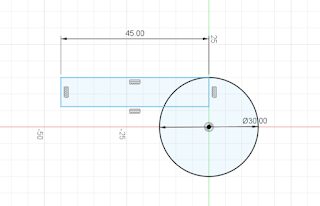
Firstly, draw a circle 30mm in diameter
At the tip of the circle, draw a 2 point rectangle 45mm x 9mm
Extrude the entire object by 25mm
Using the shell tool under modify, click on the end plane of the whistle and set it to 1.5mm
Create a new sketch and draw a 2 point rectangle
Use the dimension tool to ensure rectangle is symmetrical (3mm from edges)
Click on the rectangle you just drew and extrude it (-4mm) , creating a hole
Select the inner side of the whistle
Under create, select on sphere and label the dimension 8mm
Under Modify, select Move and shift the ball up 4mm
This ensures the ball is as close to the side as possible to make it easier to 3D print
Congratulations! You just designed a whistle from scratch!
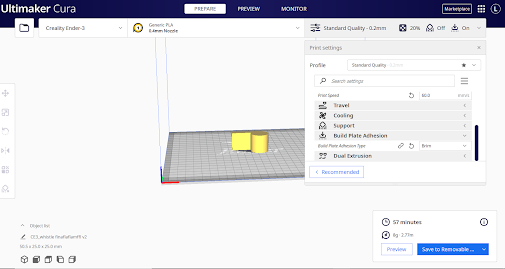
I used a Creality Ender 3 to print my whistle and here are the following settings I used.
- Set Build Plate Adhesion to Brim
- Speed : 60mm/s
Final 3D Printed Product
Hero shot !
Reflection
Overall, I found this experiment very interesting as I managed to experience and observe first hand what it was like to 3D print an object. The task was for me to achieve a maximum of an hour for printing, which posed as a problem for me as my initial design had a printing time of >2hours. After some assistance from TEs and peers from other classes, I managed to reduce it to 57mins, by increasing print speed and decreasing the size of the design. I felt that my 3D printing process went smoothly as I did not have to reprint or deal with any issues like the filament not sticking properly. I feel that this experiment has taught me interesting new skills like how to 3D print and also refined my Fusion360 skills by having me create and sketch out a design by myself.


Comments
Post a Comment